Well it was that time of year again for the Christmas Ale to come rolling out, and I had my fill of it over the holidays. I’ve never tried brewing a clone of the beer, so this year I thought that I would. I got to it a bit later than I would have liked, but the five gallons I got will carry me through the snowy months as I brew Stout and then, in March, and Oktoberfest.
Amt
Name
Type
#
%/IBU
Volume
12 lbs
Pale Malt
Grain
1
78.0 %
0.94 gal
1 lbs 3.2 oz
Caramel/Crystal Malt – 40L (53.4 SRM)
Grain
2
7.8 %
0.09 gal
12.8 oz
Wheat, Flaked (1.6 SRM)
Grain
3
5.2 %
0.06 gal
5.1 oz
Special Roast (50.0 SRM)
Grain
4
2.1 %
0.03 gal
1.0 oz
Roasted Barley (300.0 SRM)
Grain
5
0.4%
0.00 gal
1.0 oz
Liberty [4.30 %] – Boil 60.0 min
Hop
6
11.6 IBUs
—
1.0 oz
Liberty [4.30 %] – Boil 15.0 min
Hop
7
5.7 IBUs
—
1.0 oz
Ginger Root (Boil 12.0 mins)
Herb
8
—
—
1.0 oz
Cascade [5.50 %] – Boil 11.0 min
Hop
9
5. IBUs
—
4.0 oz
Cinnamon Stick (Boil 5.0 mins)
Spice
10
—
—
1 lb
Honey [Primary]
Honey
11
6.5%
0.08 gal
I had to make some modifications based on the ingredients I had on hand, but this is the recipe I ended up with:
My mash volume was 6.52 gallons with a pH of 5.3 and my sparge volume was 3.73 gallons with a pH of 5.2. My pre-boil volume was 8 gallons (I overshot the 7.4 recommended), but boiled it 75 minutes instead of 60 minutes. I mashed at between 154 degrees and 156 degrees for 60 minutes, the sparge took around the same amount of time at 168 degrees. (I donated my spent grains to a neighbor who has chickens.) My measured pre-boil gravity was 1.056, and my measured original gravity was 1.070. I brew using a Grainfather, so the mash was continually re-circulating. I pitched a California Ale yeast (WLP001), for which I created a starter. The yeast was old (September 2021 expiration), so I hedged my bet and also pitched Safale US-05 into the fermenter. The wort went into the fermenter at 68 degrees, I oxygenated it via O2 and a stone prior to pitching the yeast. The beer finished fermenting three days ago, January 3, 2022, and started fermenting within 24 hours. It was a long fermentation as I brewed the beer on December 23, 2021. I’ll move it into a corny keg tomorrow and take final gravity readings at that time.
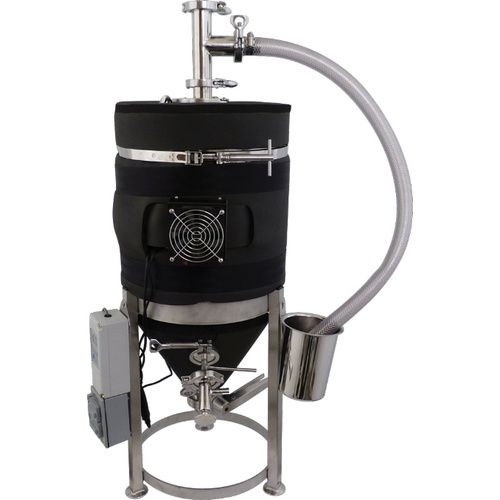
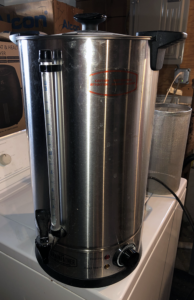
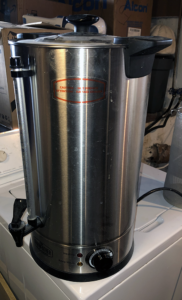
Around the same time that I purchased the Grainfather, I purchased a conical fermenter from MoreBeer.
MoreBeer Conical Fermenter
I’m used to fermenting beer in glass carboys or specially designed plastic things.
For a long time I used a digital temperature controller from Johnson Controls. It had a probe that you’d stick down a thermowell via a specially designed bung. I’d wrap the fermenter in a heated jacket, set my hot and cold range in the temperature controller, and that’d be the end of it.
While that setup isn’t the end of the world, it was not ideal. So, finally I broke down and bought a fermenter.
I purchased the 7.5 gallon fermenter, as I brew 5 gallon batches (or so). The unit came with a power strip, a power supply, a Ranco Controller for temperature, built-in heating, and a fan for cooling.
The fermenter uses a Blow Off Tube that drops into a bucket that attaches to the leg. A Blow Off Assembly and Thermowell. An insulating jacket and stainless steel stand. A Slide Racking Arm and a Bottom Dump Valve. And all the Tri-Clamps and gaskets you’ll need to put it together.
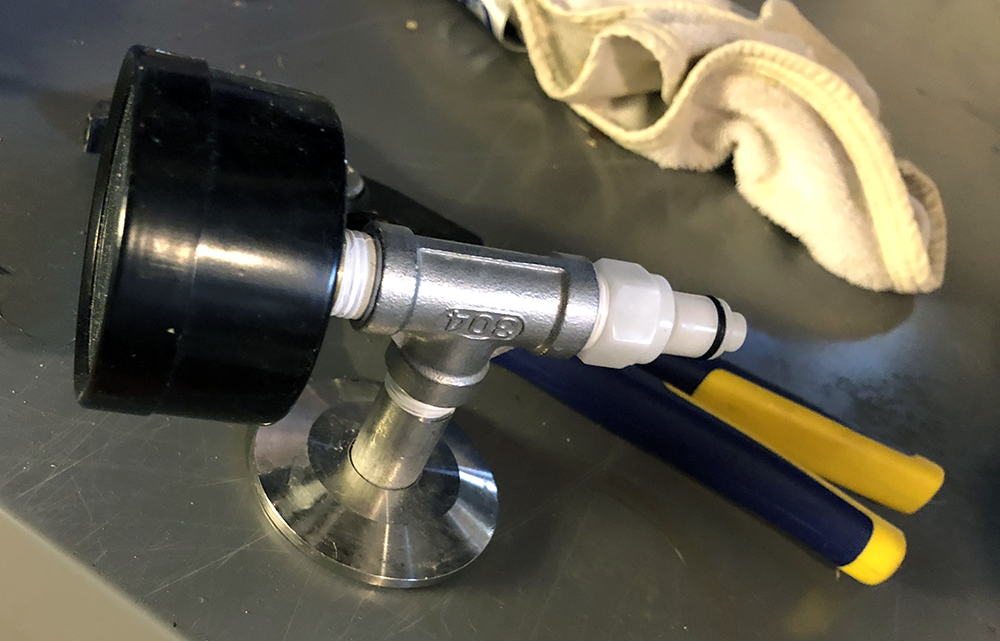
Gas Manifold, w/ CO2 quick connect.
I’m not a biochemist so I’m not taking yeast samples for culturing. However, I do use the Racking Arm to move the fermented beer directly into my kegs.
There’s a handy gas manifold that connects by Tri-Clamp to the top of the Blow Off Assembly (after you remove the Thermowell). I connect the gas manifold to my CO2 and push the beer out of the Racking Arm into my corny keg. Make sure you disconnect the Blow Off tube before you push in the CO2, else the Blow Off tube will suck like a straw right out of the bucket. (It was Star San water in the bucket…)
Now, when I’m at the end of the brew session, I use the Grainfather to pump the wort out. It goes through the Wort Chiller, the line, my Thrumometer, and right into the top of the Fermenter (before I attach the Blow Off Assembly). I oxygenate the wort with my O2 stone, pitch the yeast, and seal it all up.
The beer never hits the air again until it’s in a glass, and the world is a wonderful place.
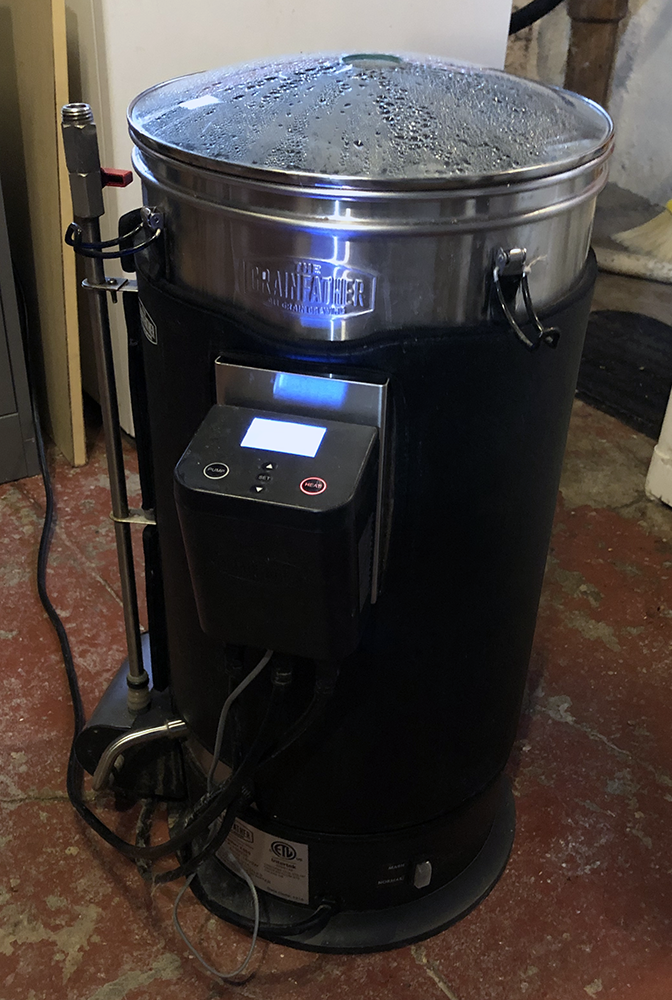
In 2017 I purchased a Grainfather in an effort to move beyond the earlier approaches I’ve used to brewing, i.e. the orange, 10-gallon Rubbermaid cooler (mash tun) with the copper manifold, spigot, etc.
While that mash tun works, and I appreciated the brews that I made on it, it really only worked for single infusion mashes, or mashes that included one or more decoction steps.
So, in late-2016, early-2017 I started looking for a system that I could direct fire (or heat). I also wanted a system that would re-circulate when mashing. Obviously, I also wanted something that could be temperature controlled, preferably by electronic (and remote) means.
At the time, I recall narrowing my options down to either the Grainfather or the Braumeister. Alternatives were expensive: for instance, a three-tiered brew systems. I felt intuitively that my wife would murder me if I spent that much on one system. Some of the options that are available today were not available when I was looking in 2016/2017.
Features
I’m not going to go into all-encompassing detail on features. There are plenty of youtube videos, as well as the Grainfather company site, to which to refer for specifics. What I’ll discuss is what I have found to be most enjoyable/useful about the system.
Recirculation
Yes, I know that recirculating infusion mash systems (rims) aren’t new, but they are to me. The system has a magnetic drive pump (6 watt, 1800 RPM). It isn’t the strongest pump in the world, but it’s better than dealing with gravity, tubing, and 212 degree wort.
Pump filter
There’s a filter in-between the interior of the Grainfather and the pump. This vastly improves the your chances for not getting a stuck sparge, as when your grain bed is sitting on your slitted manifold.
However, the filter sticks out into the Grainfather like a wart off someone’s chin, and at least one time I’ve hit it with my mash paddle where it had the effect of a straight razor on said wart. When the filter comes off the pump, you’re screwed: unless you want to stick your arm down inside boiling wort.
I purchased a hop spider, which greatly reduced the likelihood of a stuck sparge. The pump filter has large enough holes that the detritus of pellet hops slips through.
Grainfather connect
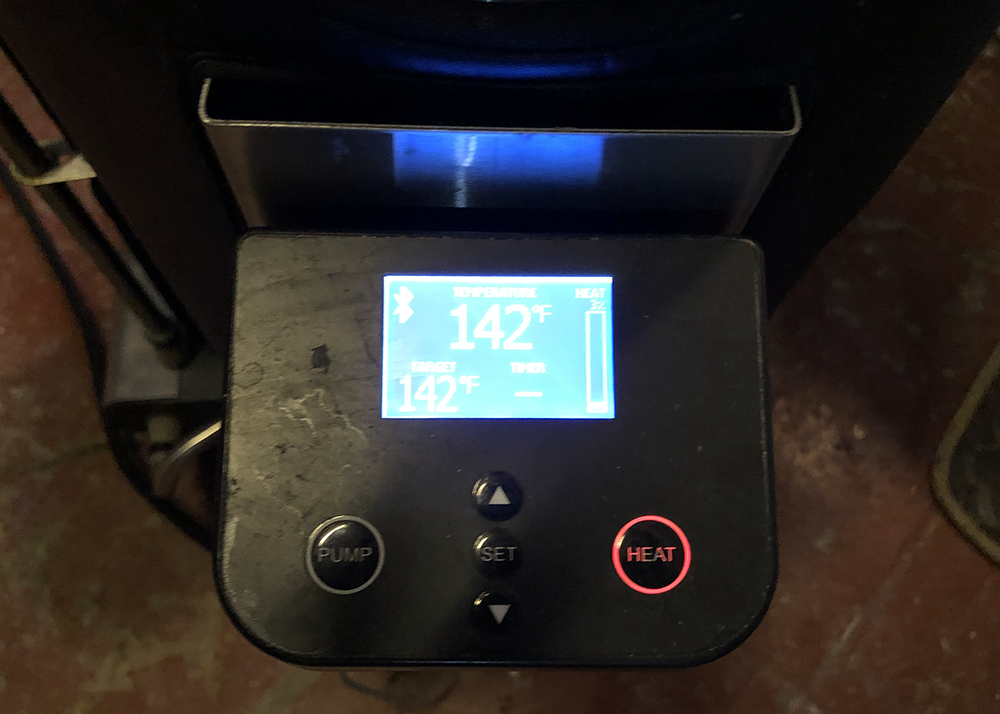
Grainfather connect allows for a bluetooth connection from your phone to the controller, so you can control all aspects of the mash timing, from your phone.
Often times I don’t have the full amount of time required to have a brew session. Grainfather connect allows me to sit with my family and still monitor a step mash, for instance.
There’s a Grainfather brewing app that allows you to put in your recipes and execute them from your phone, but the app is buggy and you’re better off setting everything up through their website and then running it from your phone.
You can also program the unit to pre-heat in advance (assuming you have the water in it and ready to go), and pre-set mash steps.
Grain basket
The design of the Grainfather in this regard is very good. When you’ve finished mashing, you simply lift the grain basket out and let the lauter begin. The “feet” on the grain basket rest on the interior brackets. You can extend the grain basket to 19.8 pounds. Extending is something I should have done during my most recent brew (to be discussed later). The limit is on mashing in the grainfather (hint: 21 pounds of grain doesn’t work very well).
Counterflow wort chiller
The wort chiller is great. As I’ve posted before, I’ve got the Blichmann Therminator which is a fantastic plate chiller. While the Therminator works better, in my opinion, than the counterflow chiller, you can connect the Grainfather counterflow chiller to the pump, which makes the difference. I’ve also connected my Blichmann Thrumometer to the brew-line-out of the Grainfather chiller, which allows for inline temperature measurements,. The Grainfather chiller works extremely well with only a slight influx of cold water. I empty the hot-line from the chiller into my washing machine so all excess water serves two purposes.
Quirks
There are some clunky aspects of the Grainfather (besides those I mention above):
If you want to perform a decoction mash while using the Grainfather, you virtually cannot use the top mesh screen. Absent the top mesh screen, you risk grain spilling into the main tank, which you’ll use later for boiling.
The top recirculation arm is very tight against the glass lid. Should you need to remove the lid, you’ll need to take the recirculation arm off to take off the lid. This ensures that hot wort will run down the side of the unit, onto the pump housing, and the floor). The unit can also be touchy in terms of scorching on the bottom.
If you fail to remove scorch marks from the bottom of the Grainfather, you’ll have some problems. The scorching will build and trigger an emergency shutoff of the Grainfather as the heating element is on the bottom. Also on the bottom is the reset button. To reset the unit, you’ll have to lift it up. That’s a problem if the unit is filled with a mash or wort. This also goes for any additions you make which could scorch (extract, honey, etc.)
Final Thoughts
Despite my pickiness about a few things with the Grainfather, it’s a positive development in my brewing experience. That I can use one piece of equipment to both mash and boil is great in itself.
The bluetooth remote control, the ease of step mashing, the pump controlled re-circulation and wort chilling, and the ease by which you can move wort into the fermenter makes the brew day nearly effortless–at least in comparison with the old Rubbermaid mash tun, and 8-gallon brew pot.
Cleaning the unit is fairly easy as well. The insulating jacket pulls off, the Grainfather connect unit disconnects, and the recirculation features of the pump can be used to clean the unit and the wort chiller.
Right now, for instance, to clean off some scorching from last night’s brew session, I’ve got the Grainfather set to 140 degrees and some PBW mixed into two gallons of water. I can control the temperature of the water via my phone and can later re-circulate the clean water through the unit and the wort chiller while sitting on my couch.
Just brewed on Saturday. First time in a long time. Details unnecessary, but back on the hoss. I’ve committed myself to brewing a Commodore Perry clone repeatedly until I get it right. An homage to a great beer.
Noting meticulously my errors and successes. So this is round one. In the future, I’ll brew 2.5 gallon increments! =)
Here’s the recipe I went with. Variations in the future will be noted.
Recipie
Ingredient
Quantity
Rahr Malt (2 Row) (1.9 SRM)
15 lbs.
Caramel/Crystal Malt – 30L (30 SRM)
1 lbs.
Honey Malt – (25 SRM)
1 lbs.
Simcoe 13.0%
1 oz. 60 min.
Cascade 5.50%
1 oz. 30 min.
Willamette 5.50%
.5 oz. 30 min.
Cascade 5.50%
.5 oz. 20 min.
Willamette 5.50%
.5 oz. 20 min.
Cascade 5.50%
.5 oz. 10 min.
Willamette 5.50%
.5 oz. 10 min.
London Ale Yeast (Wyeast Labs #1028)
2L starter
Cascade 5.50%
.5 oz. Dry Hop.
Willamette 5.50%
.5 oz. Dry Hop.
Hit my targets right on the money. It was beautiful. Too beautiful. I’m waiting for the other shoe right now, in fact.
Struck at 171 degrees and got a mash temp of 156.4. Let it sit for un hora. Then my seven-year-old son popped in to start helping me and broke yet another hydrometer. But together we pushed on to triumph. He helped through all the runs and vorlaufs:
1st Run @ 149 degrees, 3 gallons, 23 brix, 1.094 SG (no hydrometer)
2nd Run @ 143.5 degrees, 2 gallons, 23 brix, 1.094 SG (no hydrometer)
3rd Run @ who cares degrees, 2 gallons, 9 brix, 1.034 SG (no hydrometer)
Wort in 8 gallon pot at 7.0 gallons, 17.5 brix, 1.068 SG (no hydrometer)
Boiled for 70 mins, various hop additions, son helping with hop socks and sniffing and considering the differences between hop varietals. While also stirring the 7 gallons of boiling wort and causing me no end to terrible scenarios in my mind, esp while touching the ball valve on the boil pot.
Got a post boil volume of around 6 gallons at 1.079 OG, pitched the yeasties, and …
The fermentation is sluggish. Smells bad. May have effed up the starter. Sour Commodore anyone? I could be pessimistic, too. Stuck my nose in the fermenter and had my eyebrows burned off. Loving life. If this one is bad, I’ll do another.
Yes, it’s that time of year already. I christened my 5.5 gallon batch with a 1.8L starter of German Lager yeast, WPL830, yesterday at 5:00pm.
Ingredient
Amount
Munich Malt
5 lb
Pilsner Malt
5 lb
Vienna Malt
3 lb
Hallertauer
1.5 ounce (60)
Hallertauer
.5 ounce (20)
WLP830 (German Lager)
1.8 Litre
Everything went very smoothly. I treated my water with salts to boost the water profile (tsp epsom salt, tsp calcium chloride, ph stabilizer). Mashed at 156 for 50 minutes. Got 2.8 gallons on the first run at 16 brix @ 140 degrees for a 1.078. Sort of confirmed by a hydrometer reading of 1.054 @ 140 degrees = 1.070 approximately. Second run at 1.25 gallons with 10.5 brix @ 142 degrees for 1.043, hydrometer 1.030 @ 142 for 1.046. Third run at 1.5 gallons at 6.5 brix @ 148 degrees for 1.020. And a fourth run of 1.3 gallons which was nearly water and I only used about a quart. The pre-boil gravity was 1.056. I boiled for one hour. Cooled the wort to 63 degrees (which is the temperature of my basement where the starter had been sitting) and pitched. OG was at 1.050 which I’ll discuss in a minute. Hooked up to my handy-dandy Johnson control unit/heater set up and threw the fermenter in the refrigerator at 53 degrees. Now I’ll just wait for nature to take it’s course.
Per the above, I continue to have issues, for some inexplicable reason, with my gravities at OG time. I cannot understand how a wort with a pre-boil gravity of 1.056 can boil for one hour and come out at 1.050. That seems impossible. Water should evaporate and sugar should not. I confirmed with the refractometer which showed even lower. This is a source of endless confusion for me. I can understand if one over-collects on the sparge and then has too much water in the kettle, but I measured the pre-boil gravity… Regardless, I may have to take another tack and do some calculations on pre-boil gravity, evaporation rates, and so on to see if I can estimate the OG. But the fact that the tools reported something else is highly upsetting. In the end, I guess, it’s all about what the beer tastes like. But still.
Is in the keg. Took the final gravity reading at 1.015, a bit higher than what I expected, especially given the large, highly-active starter that I pitched. But, it has a nice color and taste, even though flat. Now I just wait for carbonation.
Just sent a bottle of tap to Ward Laboratories in Kearney, Nebraska. The water report is as follows:
pH
7.5
Total Dissolved Solids (TDS) Est ppm
170
Electrical Conductivity, mmho/cm
0.28
Cations/Anions, me/L
3.0 / 2.7
ppm
Sodium, Na
10
Potassium, K
1
Calcium, Ca
35
Magnesium, Mg
10
Total Hardness, CaCO3
129
Nitrate, NO3-N
0.3 (Safe)
Sulfate, SO4-S
12
Chloride, Cl
13
Carbonate, CO3
< 1
Bicarbonate, HCO3
97
Total Alkalinity, CaCO3
80
Flouride, F
1.14
Total Iron, Fe
< 0.01
I’ve heard that the profile for Cleveland water differs in winter from summer. So, I may have to send off for another report later this year.
My next brew is going to be an Oktoberfest/Marzen. So, I will see what it takes to create a water profile that aligns with one from German regions based on this report. Found a pretty interesting article on Homebrew Water Treatment at The Mad Fermentationist.
My last brew session was a Conway’s Irish Ale clone of the Great Lakes Brewery beer. I chose this one at my wife’s behest and the thought that my dad would enjoy this one as well.
The clone is not precise for a few reasons, the first being that I don’t have a whole lot of money to throw around right now and I had a backlog of ingredients on hand. As I pursued a clone recipe for Conway I learned that Great Lakes uses Harrington 2-row as the base for most of its brews. This is good to know, as I have a desire to try a few clones: for instance, my Christmas ale this year used a Nosferatu clone as the base–again, however, I didn’t know about the Harrington 2-row. I learned about the base characteristics of Great Lakes brews from a nice post on The Beerists blog site.
Additionally, Great Lakes uses quite a bit of Cascade.
Regardless, here is the clone that I used:
11 lb Maris Otter
.75 lb Crystal 80
.10 lb Crystal 40
1 oz Northern Brewer (30 min)
1 oz Hallertauer (10 min)
.75 oz Fuggle (5 min)
WLP002 British Ale yeast
We’ll see how this compares, although I expect significant differences. In the future, I aim to try this again with a more precise version that uses Harrington 2-row, Cascade, and Wyeast London Ale 1028.


