Plate Chiller Heaven
The next piece of equipment that I’d like to type about is my Blichmann Therminator plate chiller and accompanying pieces of equipment.
I have to say, first, from a purely emotive perspective: I love the Therminator. I used a more traditional wort chiller for several years: the old copper coil submerged in the brew kettle. I didn’t like the coil because: 1) it took forever to cool the wort (and wasted water); 2) if I didn’t tighten it properly, water leaked into the wort; 3) you had to submerge it in boiling wort to sanitize it; 4) it was a pain in the ass to deal with the thing sticking out of the brew kettle and it interfered with the whirlpooling of sediment.
I also tried other approaches to cooling the wort. Often you’ll read suggestions for an ice water bath, etc., which to my mind takes too damn long if you’re truly attempting to get a cold break. As I said, I have tried other approaches, which culminates in my telling yet another embarrassing story of my brew past. There was this one time… Seriously, it was in the middle of winter, a foot of snow, near zero temperatures outside. I thought: why not? Took the old brew kettle, full as it was, outside and plunked it down in a snow bank. I went inside, cleaned up, and plopped down with a frosty pint and started watching a movie with my wife.
When out on the lawn there arose such a clatter
I sprang from the couch to see what was the matter.
Away to the window I flew like a flash
Tore open the blinds and threw up the sash.
I’ll spare you the bit about the moon, for all was blackness to my eyes at that point: five gallons of future joy stained the snow like blood after a winter battle. Yes, I learned that night that snow melts unevenly–or that heat dissipates unevenly–or that something does something unevenly. Outside I picked-up the now empty brew kettle from off its side, along with the lid, and trudged back into the house utterly forlorn. For a month I had to watch my very young daughter point at the black ice and listen to her say, “there’s daddy’s beer.”
So, plate chillers are good.
Features
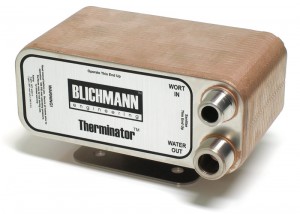
The other that I’ve seen (on Morebeer) is the Shirron plate chiller, which is about half the price of the Therminator. I’ve not tested or used them all, so I can’t speak to the best features or disappointments of the class of products–Blichmann does have test results on their site, but of course: It’s their site. I picked it up the Therminator from the grapeandgranary in January, 2009, for $199.95. At the same time I also picked up the Blichmann Thrumometer.
According to Blichmann, the Therminator is:
- Identical to those used by commercial breweries
- Can chill 10 gallons in 5 minutes
- Is Ultra compact
- Easy to clean and sanitize
- Uses garden hose thread connections
- Saves water
- Comes with a heavy duty mounting bracket
Use
There are other features listed on the site. The Therminator is pretty straightforward: you have a connector labeled WORT IN and WATER OUT. The connector sizes are different for each channel–so, the WORT only connects to WORT, and WATER to WATER. There is a mounting plate that is attached by bolts on the back. I don’t think I’ve ever chilled 5 gallons of beer in 5 minutes, but certainly less than 10 minutes. However, I’ve not tested the throughput of the flow of water that I’m using. Blichmann’s site states that it uses 5 gallons per minute. It has to be pretty close to that, though, as I’ve filled up two 7-gallon fermenting bucket 2 times (4 times/28 gallons) with the water that goes through the Therminator. I dump the water in the washing machine; in the summer sometimes I dump the water in the garden. In terms of compactness, it does not take up much space and it is easily placed in a fermenting bucket filled with sanitizer or, as the Blichmann site says, in a pot to boil. The thread connectors are quite important as, once you have the appropriate connectors for your hoses, everything fits together easily. I had to go to a hardware store and pick up an adapter for the kitchen faucet and I created my own WORT IN and WORT OUT hoses by picking up the appropriate threaded connector accessory kit. The ease of this made me feel pretty stupid after I had already ordered the Backflush hose, which is simply another piece of hose with the garden thread connector on one side and the quick connector on the other.
In use, I connect the barb valve in the Brew Kettle to and ID hose with the quick connect on the opposite end. This connects to the WORT IN connector on the Therminator. I connect the other ID line with the quick connect on it to the WORT OUT side. This hose has the Thrumometer in the middle to gauge the flow temperature of the wort as it comes out of the Therminator. The ID line flows directly into the fermenting bucket. I connect garden hose connector one to the faucet and the opposite end to the WATER IN on the Therminator; likewise, garden hose connector number two to the WATER OUT and the opposite end is just an open ID line into a 7 gallon bucket for collecting the water. Often there is some adjusting of the temperature of the water coming out of the faucet because, believe it or not, I’ve actually had instances where the wort coming out of the Therminator is too cold for an ale yeast starter.
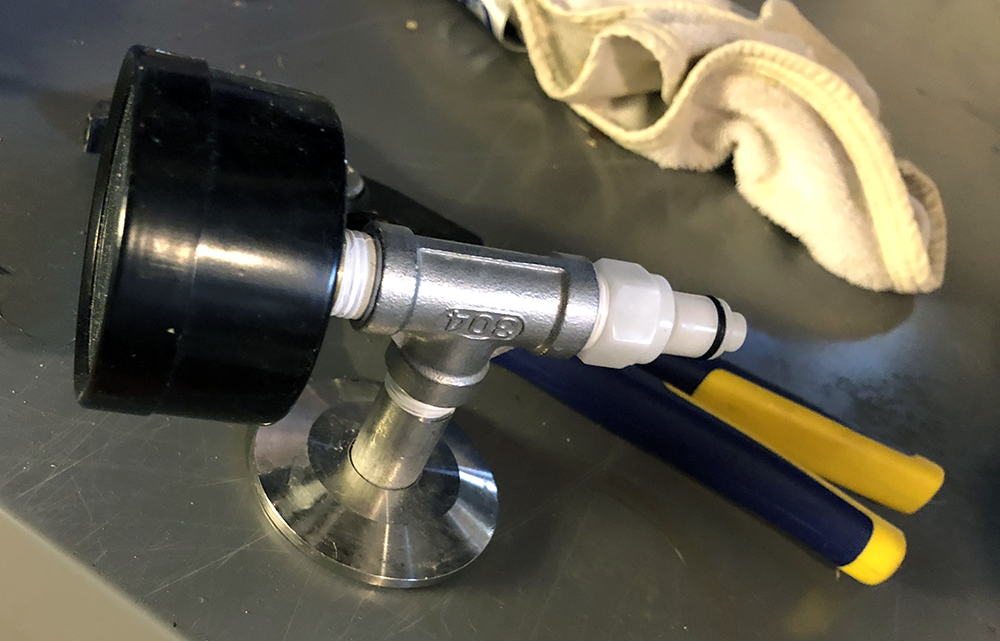
Thrumometer
The Thrumometer is an instrumental tool, I think, for monitoring the temperature of the water coming out of the process. I always have a digital thermometer in the wort to ensure that the reading is on target and it generally is; though sometimes there will be variance in how hot the temperature of the wort is when it initially comes out and once the plate chilller has been active for a bit. The Thrumometer is an inline measure and it’s pretty passive, but it works. The tool itself measures temperatures between 88 degrees and 58 degrees. It is made of aluminum and has a black temperature gauge that changes color as a temperature is reached: the color moves between black, to dark blue to bright green when the constant temperature of the wort settles.
Backflush Hose
The Backflush hose is important. After I’ve aerated the wort and pitched the yeast and the beer is safely and happily snugged away, I take off the WATER OUT hose from the previous process and connect the garden hose connector of the Backflush to it. I take off the line from the barb valve to the WORT IN as well, and then connect the quick connector of the Backflush hose to the WORT IN of the Therminator. In essence, the Backflush hose is connecting the WATER side of the Therminator to the WORT side. I heat up the water from the faucet and let it flush out the Therminator, which is generally pretty full of hop sludge and other break material. I then move the WORT connector to the WORT OUT and repeat the process, flushing in reverse. I’ll do this a couple of times to clear the Therminator and then I’ll dunk it in a sanitizing bucket while I clean up.
Conclusion
All-in-all I’m pretty pleased with the Therminator plate chiller, and while I can’t speak comparatively to other plate chillers in how they compare, the Therminator is a big step up from the traditional coil wort chillers and definitely beats ice bathes and snow banks.