Author: admin

Get your beer on!Get your beer on!

Cleveland Beer Week is upon us, with dozens of great breweries descending upon Cleveland in a host of locations throughout the city. Jammin’ brews will be available from East to West in our fair City of Cle, from XYZ Tavern to the Cedar Lee–and from North to South.

Love Stone Brewing Co? Great Lakes? Hoppin Frog? Fat Heads? They’re here. 21st Amendment? Dogfish Head? Smuttynose? Sierra Nevada? They’re here. Beer will be flowing and locations will be hoppin–literally in a whole slush of senses.

If you love beer, this coming week is a GREAT week to be in Cleveland. I’m definitely going to find a way to get away from the children, out of the house, and hit a few locations for some frosty pints!

For more information including events, breweries, and locations check out http://www.clevelandbeerweek.org/

Equipment – Brew Kettle – 32 QuartEquipment – Brew Kettle – 32 Quart

I thought I’d kick off my more serious blog discussions by talking about my equipment; ideally this will accomplish two things: address my own process and force me to inventory everything that is scattered all around.

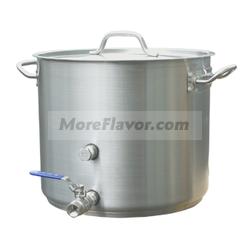
Thanks to MoreBeer’s order history feature I can state that on January 23, 2008 I purchased my brew kettle.  I purchased the Heavy Duty Brew Kettle – With Ball Valve (32 Quart/8 Gallon)– BE308; at the same time I added in the Dial Thermometer (3” Face x 6” Probe)–MT502.  The 8 gallon brew kettle has two ports: one for the thermometer and the other for a ball valve, which I also picked up: Stainless – 1/2 in. mpt x 1/2 in. Barb–H618.  I’ll put the full equipment list at the bottom for easier reading.

The ball valve obviously makes it easy to get the boiling hot wort out of the kettle and the barb reduces the flow so it can drain into a 1/2” vinyl tube rated for 212 degree temps.  Once this hits the wort chiller, which I’ll discuss later, I can quickly get the temps down to pitch temperatures.  The thermometer works well and I’ve paired the temperatures it reports against a digital thermometer and they match up.  Nice to test analog against digital and get good results!  The one thing that’s tricky is you have to have a bit more than three gallons in the kettle in order for the liquid levels to be high enough for the thermometer to register temperatures.  And on this note, I’ll also comment that a better design of the kettle would include some internal method of marking liquid measures.  As manufactured, there are no gallon markings–markings that are present on smaller stainless pots I have around the house.  This forces me to lauter into plastic buckets with spouts to measure what I drain off –and then re-drain the wort into the boil kettle.  (All to avoid hot side aeration.)  With regard to there being no markings, I have figured out over time that I’ve got about 6.5 gallons in the kettle when the wort level hits the handle bolts on either side.

In October 2009 I picked up a false bottom for the kettle (H111) as I made the move to all-grain and thought I could avoid the construction of a mash/lauter tun.  The reality is that the 8-gallon kettle is not suitable for all-grain brewing.  The ratios of water to grain that are necessary for most beers make it somewhat perilous and messy to attempt mashing in the kettle.  I’m sure that it would work fine for lower gravity or session beers, and I really should try that. Unfortunately (or fortunately) I like to brew big beers–imperials and barley wines, and the grain bill and water ratios just exceed the volume of the kettle.  Here I’ll relate and embarrassing tale as well.  Early on I thought I could get around this problem by doing two-part mashes and using the first runnings and mix them together for the brew.  Of course, the result was that I had two beers with average gravities and mixing them only made one big batch with an average gravity.  This demonstrates my mathematical logic at work.  The ultimate point, here, being that if you anticipate using the brew kettle for mashing and you think you might make the move to all-grain then you should buy a bigger kettle–probably a 60 quart.  If you intend to brew extracts or partials, then the 32 quart kettle should work fine.

Ultimately, the kettle is absolutely solid and I can continue to use it for boils–presuming 5 gallon brews.

8 Gal Beer Brewing Kettle w/ Valve & Thermometer

Ohio breweries win at Great American Beer FestivalOhio breweries win at Great American Beer Festival

Just got an email announcing the results from the Great American Beer Festival for 2011. There is some credit to go around for Northeast Ohio. Check out the results at Beernews.org.

Category: 21 Wood- and Barrel-Aged Strong Beer – 118 Entries
Gold: Melange a Trois, Nebraska Brewing Co., Papillion, NE
Silver: BBJ (Bourbon Barrel Johan), Sun King Brewing Co., Indianapolis, IN
Bronze: Barrel Aged Naked Evil BBW, Hoppin’ Frog Brewing Co., Akron, OH

In particular, let’s point out both Hoppin’ Frog Brewing Co. and Fat Head’s Brewery, both of which received a gold medal in one of the categories they entered.

Category: 42 Baltic-Style Porter – 19 Entries
Gold: Battle Axe Baltic Porter, Fat Head’s Brewery, North Olmsted, OH
Silver: White Eagle Baltic Porter, Montana Brewing Co., Billings, MT
Bronze: Puddy Porter, Triple Rock Brewery and Alehouse, Berkeley, CA

Category: 51 American-Style India Pale Ale – 176 Entries
Gold: Elevated IPA, La Cumbre Brewing Co., Albuquerque, NM
Silver: Deviant Dale’s, Oskar Blues Brewery, Longmont, CO
Bronze: Head Hunter IPA, Fat Head’s Brewery, North Olmsted, OH

Category: 80 Imperial Stout – 56 Entries
Gold: BORIS The Crusher Oatmeal-Imperial Stout, Hoppin’ Frog Brewing Co., Akron, OH
Silver: Russian Imperial Stout, Iron Hill Brewery & Restaurant, Wilmington, DE
Bronze: IMOS, Max Lager’s Wood-Fired Grill & Brewery, Atlanta, GA

Congratulations! Let’s all go and grab some of these tasty beers!

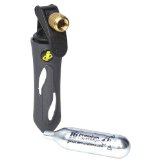
Cornelius Keg CO2 ChargerCornelius Keg CO2 Charger

The Cornelius Keg CO2 Charger worked like a charm yesterday and the beer went quickly. I will admit that I was a little disappointed at the rate at which the CO2 cartridges were expended, especially given the cost, at around $2.00 a piece, depending on where you pick them up. 

I was in the kitchen enjoying my Marzen when someone came into inform me that my keg wasn’t working. I think it took all of :45 minutes or so for the cartridge to go. I was lucky that when I ordered the adapter kit for the Keg Charger I ordered an extra cartridge, but only one. It didn’t take long for that one to go, too. I was lucky that Mike Piazza was there with his setup, dispensing a spicy and balanced Weizenbock that he brewed, so he could hook it up quickly to mine and gas the keg up.

So, big take-away with the Keg Charger: 1) don’t use them and bring your CO2 tank along; 2) if you do use it, bring plenty of cartridges for your Charger because you’ll need them.