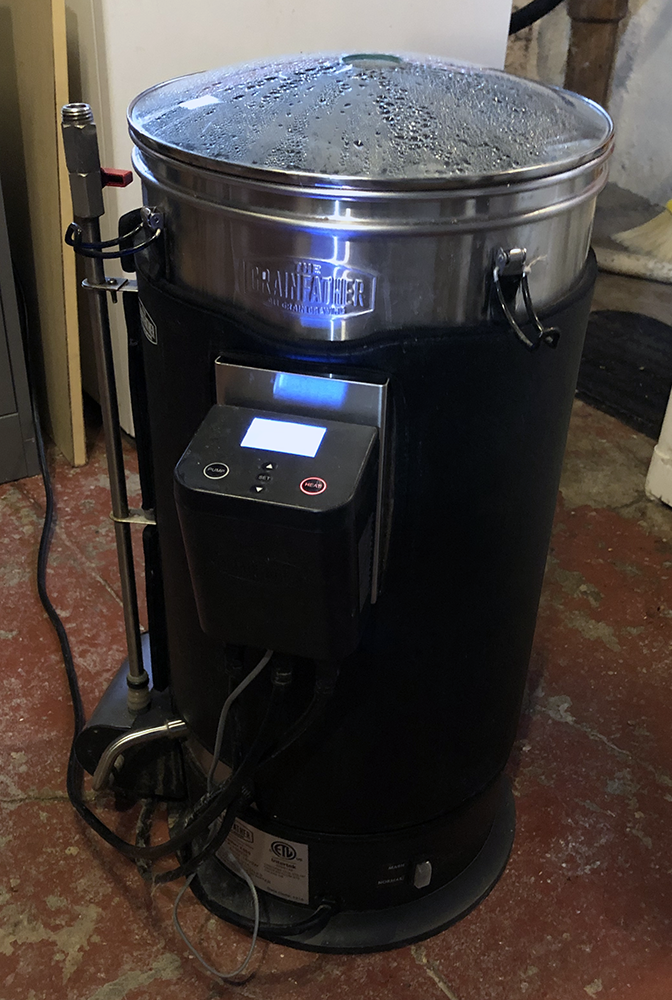
In 2017 I purchased a Grainfather in an effort to move beyond the earlier approaches I’ve used to brewing, i.e. the orange, 10-gallon Rubbermaid cooler (mash tun) with the copper manifold, spigot, etc.
While that mash tun works, and I appreciated the brews that I made on it, it really only worked for single infusion mashes, or mashes that included one or more decoction steps.
So, in late-2016, early-2017 I started looking for a system that I could direct fire (or heat). I also wanted a system that would re-circulate when mashing. Obviously, I also wanted something that could be temperature controlled, preferably by electronic (and remote) means.
At the time, I recall narrowing my options down to either the Grainfather or the Braumeister. Alternatives were expensive: for instance, a three-tiered brew systems. I felt intuitively that my wife would murder me if I spent that much on one system. Some of the options that are available today were not available when I was looking in 2016/2017.
Features
I’m not going to go into all-encompassing detail on features. There are plenty of youtube videos, as well as the Grainfather company site, to which to refer for specifics. What I’ll discuss is what I have found to be most enjoyable/useful about the system.
Recirculation
Yes, I know that recirculating infusion mash systems (rims) aren’t new, but they are to me. The system has a magnetic drive pump (6 watt, 1800 RPM). It isn’t the strongest pump in the world, but it’s better than dealing with gravity, tubing, and 212 degree wort.
Pump filter
There’s a filter in-between the interior of the Grainfather and the pump. This vastly improves the your chances for not getting a stuck sparge, as when your grain bed is sitting on your slitted manifold.
However, the filter sticks out into the Grainfather like a wart off someone’s chin, and at least one time I’ve hit it with my mash paddle where it had the effect of a straight razor on said wart. When the filter comes off the pump, you’re screwed: unless you want to stick your arm down inside boiling wort.
I purchased a hop spider, which greatly reduced the likelihood of a stuck sparge. The pump filter has large enough holes that the detritus of pellet hops slips through.
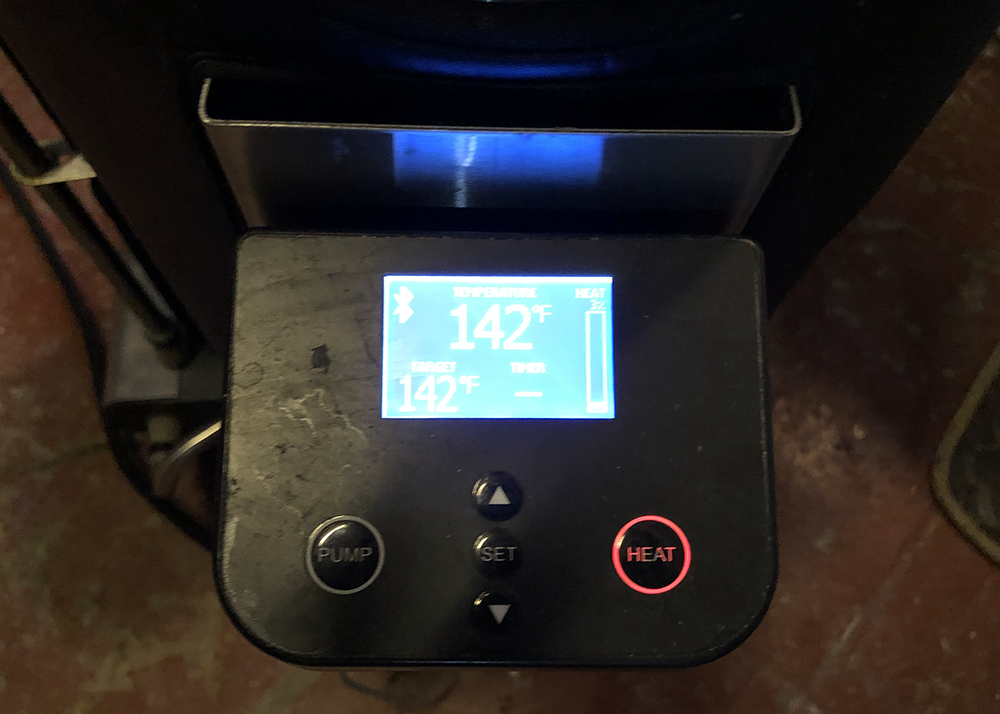
Grainfather connect
Grainfather connect allows for a bluetooth connection from your phone to the controller, so you can control all aspects of the mash timing, from your phone.
Often times I don’t have the full amount of time required to have a brew session. Grainfather connect allows me to sit with my family and still monitor a step mash, for instance.
There’s a Grainfather brewing app that allows you to put in your recipes and execute them from your phone, but the app is buggy and you’re better off setting everything up through their website and then running it from your phone.
You can also program the unit to pre-heat in advance (assuming you have the water in it and ready to go), and pre-set mash steps.
Grain basket
The design of the Grainfather in this regard is very good. When you’ve finished mashing, you simply lift the grain basket out and let the lauter begin. The “feet” on the grain basket rest on the interior brackets. You can extend the grain basket to 19.8 pounds. Extending is something I should have done during my most recent brew (to be discussed later). The limit is on mashing in the grainfather (hint: 21 pounds of grain doesn’t work very well).
Counterflow wort chiller
The wort chiller is great. As I’ve posted before, I’ve got the Blichmann Therminator which is a fantastic plate chiller. While the Therminator works better, in my opinion, than the counterflow chiller, you can connect the Grainfather counterflow chiller to the pump, which makes the difference. I’ve also connected my Blichmann Thrumometer to the brew-line-out of the Grainfather chiller, which allows for inline temperature measurements,. The Grainfather chiller works extremely well with only a slight influx of cold water. I empty the hot-line from the chiller into my washing machine so all excess water serves two purposes.
Quirks
There are some clunky aspects of the Grainfather (besides those I mention above):
- If you want to perform a decoction mash while using the Grainfather, you virtually cannot use the top mesh screen. Absent the top mesh screen, you risk grain spilling into the main tank, which you’ll use later for boiling.
- The top recirculation arm is very tight against the glass lid. Should you need to remove the lid, you’ll need to take the recirculation arm off to take off the lid. This ensures that hot wort will run down the side of the unit, onto the pump housing, and the floor). The unit can also be touchy in terms of scorching on the bottom.
- If you fail to remove scorch marks from the bottom of the Grainfather, you’ll have some problems. The scorching will build and trigger an emergency shutoff of the Grainfather as the heating element is on the bottom. Also on the bottom is the reset button. To reset the unit, you’ll have to lift it up. That’s a problem if the unit is filled with a mash or wort. This also goes for any additions you make which could scorch (extract, honey, etc.)
Final Thoughts
Despite my pickiness about a few things with the Grainfather, it’s a positive development in my brewing experience. That I can use one piece of equipment to both mash and boil is great in itself.
The bluetooth remote control, the ease of step mashing, the pump controlled re-circulation and wort chilling, and the ease by which you can move wort into the fermenter makes the brew day nearly effortless–at least in comparison with the old Rubbermaid mash tun, and 8-gallon brew pot.
Cleaning the unit is fairly easy as well. The insulating jacket pulls off, the Grainfather connect unit disconnects, and the recirculation features of the pump can be used to clean the unit and the wort chiller.
Right now, for instance, to clean off some scorching from last night’s brew session, I’ve got the Grainfather set to 140 degrees and some PBW mixed into two gallons of water. I can control the temperature of the water via my phone and can later re-circulate the clean water through the unit and the wort chiller while sitting on my couch.
I’ve included some other photos below.
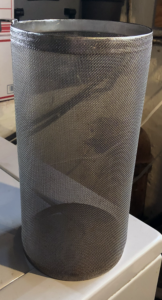
Hop spider 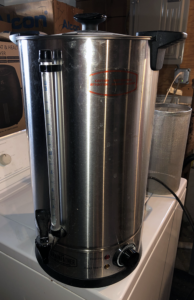
Sparge water heater 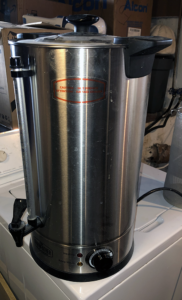
Sparge water heater


1 thought on “Grainfather all-in-one brewing system”