Spent part of Monday brewing outdoors. The first time I’ve done that. I purchased a Blichmann floor burner from Grape and Granary a few years back and just hadn’t gotten around to using it; well, now I can say that I have.
The burner is fantastic and connects to a propane tank. It puts out 72,000 BTU’s per hour which translates to a whole lot of heat for fast boils. I am used to brewing in my kitchen where I use a standard gas range. The time to boil was a great delay in the brew day for me. After lautering and sparging and collecting the wort into the boil kettle, the time from that 160 or so degrees to 212 was too much. It could take nearly an hour just to get to boil. I didn’t time things out specifically, but I would swear that the Blichmann was heating water at around 10 degrees every five minutes, maybe even faster. So in approximately twenty to twenty-five minute it was boiling. It happened so fast, in fact, that I had my first boil over in years, even with fermcap. But it was outdoors, so only the ants were pissed (and me later, when I had to scrub the pot).
Another upshot with outdoor brewing is that I just ran the hose to the kettle and used the hose to connect to the Blichmann plate chiller that I have. The excess water that comes in chilling the wort went straight into the garden beds for the very thirsty pumpkins, cucumbers, and peppers. The main drawback was that the water temperature was very difficult to get down, with the nearly 100 degree heat, so I could only chill the wort to 77 degrees, which is a bit high for pitching (but I did it anyway).
I brewed a Brown Ale with lots of Cascade and Nugget hops. The Nugget came straight from my backyard, circa 2011 (vacuum sealed in the freezer). It was a low gravity extract beer which I am using as a yeast starter (essentially) for an all-grain Imperial Red (Nosferatu clone) that I’ll brew in a week or two.
The next piece of equipment that I’d like to type about is my Blichmann Therminator plate chiller and accompanying pieces of equipment.
I have to say, first, from a purely emotive perspective: I love the Therminator. I used a more traditional wort chiller for several years: the old copper coil submerged in the brew kettle. I didn’t like the coil because: 1) it took forever to cool the wort (and wasted water); 2) if I didn’t tighten it properly, water leaked into the wort; 3) you had to submerge it in boiling wort to sanitize it; 4) it was a pain in the ass to deal with the thing sticking out of the brew kettle and it interfered with the whirlpooling of sediment.
I also tried other approaches to cooling the wort. Often you’ll read suggestions for an ice water bath, etc., which to my mind takes too damn long if you’re truly attempting to get a cold break. As I said, I have tried other approaches, which culminates in my telling yet another embarrassing story of my brew past. There was this one time… Seriously, it was in the middle of winter, a foot of snow, near zero temperatures outside. I thought: why not? Took the old brew kettle, full as it was, outside and plunked it down in a snow bank. I went inside, cleaned up, and plopped down with a frosty pint and started watching a movie with my wife.
When out on the lawn there arose such a clatter I sprang from the couch to see what was the matter. Away to the window I flew like a flash Tore open the blinds and threw up the sash.
I’ll spare you the bit about the moon, for all was blackness to my eyes at that point: five gallons of future joy stained the snow like blood after a winter battle. Yes, I learned that night that snow melts unevenly–or that heat dissipates unevenly–or that something does something unevenly. Outside I picked-up the now empty brew kettle from off its side, along with the lid, and trudged back into the house utterly forlorn. For a month I had to watch my very young daughter point at the black ice and listen to her say, “there’s daddy’s beer.”
So, plate chillers are good.
Features
The other that I’ve seen (on Morebeer) is the Shirron plate chiller, which is about half the price of the Therminator. I’ve not tested or used them all, so I can’t speak to the best features or disappointments of the class of products–Blichmann does have test results on their site, but of course: It’s their site. I picked it up the Therminator from the grapeandgranary in January, 2009, for $199.95. At the same time I also picked up the Blichmann Thrumometer.
According to Blichmann, the Therminator is:
Identical to those used by commercial breweries
Can chill 10 gallons in 5 minutes
Is Ultra compact
Easy to clean and sanitize
Uses garden hose thread connections
Saves water
Comes with a heavy duty mounting bracket
Use
There are other features listed on the site. The Therminator is pretty straightforward: you have a connector labeled WORT IN and WATER OUT. The connector sizes are different for each channel–so, the WORT only connects to WORT, and WATER to WATER. There is a mounting plate that is attached by bolts on the back. I don’t think I’ve ever chilled 5 gallons of beer in 5 minutes, but certainly less than 10 minutes. However, I’ve not tested the throughput of the flow of water that I’m using. Blichmann’s site states that it uses 5 gallons per minute. It has to be pretty close to that, though, as I’ve filled up two 7-gallon fermenting bucket 2 times (4 times/28 gallons) with the water that goes through the Therminator. I dump the water in the washing machine; in the summer sometimes I dump the water in the garden. In terms of compactness, it does not take up much space and it is easily placed in a fermenting bucket filled with sanitizer or, as the Blichmann site says, in a pot to boil. The thread connectors are quite important as, once you have the appropriate connectors for your hoses, everything fits together easily. I had to go to a hardware store and pick up an adapter for the kitchen faucet and I created my own WORT IN and WORT OUT hoses by picking up the appropriate threaded connector accessory kit. The ease of this made me feel pretty stupid after I had already ordered the Backflush hose, which is simply another piece of hose with the garden thread connector on one side and the quick connector on the other.
In use, I connect the barb valve in the Brew Kettle to and ID hose with the quick connect on the opposite end. This connects to the WORT IN connector on the Therminator. I connect the other ID line with the quick connect on it to the WORT OUT side. This hose has the Thrumometer in the middle to gauge the flow temperature of the wort as it comes out of the Therminator. The ID line flows directly into the fermenting bucket. I connect garden hose connector one to the faucet and the opposite end to the WATER IN on the Therminator; likewise, garden hose connector number two to the WATER OUT and the opposite end is just an open ID line into a 7 gallon bucket for collecting the water. Often there is some adjusting of the temperature of the water coming out of the faucet because, believe it or not, I’ve actually had instances where the wort coming out of the Therminator is too cold for an ale yeast starter.
Thrumometer
The Thrumometer is an instrumental tool, I think, for monitoring the temperature of the water coming out of the process. I always have a digital thermometer in the wort to ensure that the reading is on target and it generally is; though sometimes there will be variance in how hot the temperature of the wort is when it initially comes out and once the plate chilller has been active for a bit. The Thrumometer is an inline measure and it’s pretty passive, but it works. The tool itself measures temperatures between 88 degrees and 58 degrees. It is made of aluminum and has a black temperature gauge that changes color as a temperature is reached: the color moves between black, to dark blue to bright green when the constant temperature of the wort settles.
Backflush Hose
The Backflush hose is important. After I’ve aerated the wort and pitched the yeast and the beer is safely and happily snugged away, I take off the WATER OUT hose from the previous process and connect the garden hose connector of the Backflush to it. I take off the line from the barb valve to the WORT IN as well, and then connect the quick connector of the Backflush hose to the WORT IN of the Therminator. In essence, the Backflush hose is connecting the WATER side of the Therminator to the WORT side. I heat up the water from the faucet and let it flush out the Therminator, which is generally pretty full of hop sludge and other break material. I then move the WORT connector to the WORT OUT and repeat the process, flushing in reverse. I’ll do this a couple of times to clear the Therminator and then I’ll dunk it in a sanitizing bucket while I clean up.
Conclusion
All-in-all I’m pretty pleased with the Therminator plate chiller, and while I can’t speak comparatively to other plate chillers in how they compare, the Therminator is a big step up from the traditional coil wort chillers and definitely beats ice bathes and snow banks.
Recently brewed two clones: Founder’s Breakfast Stout and Stone Cali-Belgique. I’ve put the recipes in below, including the BeerXML files.
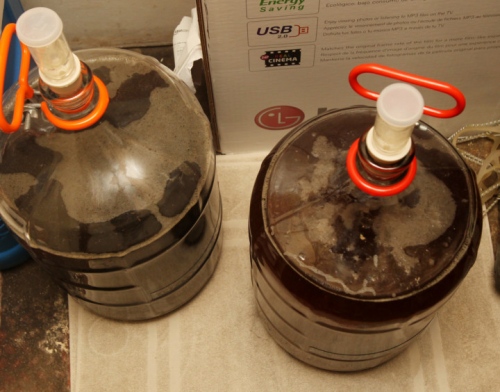
I just moved the two to the secondary last night. I added 2oz of Grand Cru to the Breakfast Stout and .5 oz of Cascade and 1.0 oz of Centennial to the Cali. Tasted both out of the primary and they were delicious. I used both a refractometer and hydrometer to see the gravity progression and to continue to test the comparison between the readings. Each seems to be on target coming in at around 1.018 and 1.016 respectively–and there’s still a bit more time in the secondary where some action will take place. I’ll bottle the Cali-Belgique for a wedding but keep some back for the All-American Homebrew Competition; a part of the Cincy Winter Beerfest.
I’m planning my next brew, which will be a Hopslam clone, and I may try to get it in before the All-American Homebrew Competition deadline, but it will be a very tight squeeze on this one. I went out to JW Dover’s homebrew store in Westlake yesterday to fill some of the holes in my inventory and had one fortuitous encounter and learned one thing I didn’t know–so it was worth the trip. First, I met the owner and proprietor Jerome Welliver and Tom ? one of the brewers who offered to provide me with yeast slurry from one of their brews. All I have to do is bring in a sanitized mason jar and they’ll fill it up. That kicks ass. I was looking for the 1056 in their yeast cooler and then I got to talking with Tom and he offered. For me this means several things: first, the slurry will be a big pitch, meaning energetic and complete attenuation/fermentation; second, it is second generation from a professional brewery; third, I hope it’s a connection that I can maintain. Second, in the grand scheme of things, what I learned is that Jerome is not only the owner and proprietor of JW Dover, but Black Box Brewing Company, which now owns the label for Crooked River and is brewing up their old recipes.
This also sparked in me two notions, one tempting the other possibly stupid. First, to brew one beer a week for the year. Don’t know if I can pull it off. But I’d like to try. I’m behind right now, but have the ingredients to brew the Hopslam and a Flanders Red, which I could so this coming week and it would put me on track for January. Second, I’m considering the Lenten trial of drinking only beer until Easter. I would be hoping to drop some pounds and let’s face it, beer tastes better than the Almased liquid diet. And besides: it’s beer! Three times per day.
We’ll see. I’m looking forward to heading out to Black Box Brewing this week to pick up the slurry and brewing up a Hopslam clone.
Recipes:
Breakfast Stout
BeerSmith Recipe Printout - www.beersmith.com
Recipe: Breakfast Stout
Brewer: Tom Hayes
Asst Brewer:
Style: American Stout
TYPE: All Grain
Taste: (35.0)
Recipe Specifications
--------------------------
Batch Size: 5.00 gal
Boil Size: 5.72 gal
Estimated OG: 1.093 SG
Estimated Color: 57.9 SRM
Estimated IBU: 64.8 IBU
Brewhouse Efficiency: 75.00 %
Boil Time: 60 Minutes
Ingredients:
------------
Amount Item Type % or IBU
13 lbs 3.2 oz Pale Malt (2 Row) US (2.0 SRM) Grain 74.66 %
1 lbs 6.4 oz Oats, Flaked (1.0 SRM) Grain 7.92 %
1 lbs Chocolate Malt (350.0 SRM) Grain 5.66 %
1 lbs Roasted Barley (300.0 SRM) Grain 5.66 %
8.0 oz Caramel/Crystal Malt -120L (120.0 SRM) Grain 2.83 %
5.3 oz Carafa III (525.0 SRM) Grain 1.87 %
4.0 oz Black (Patent) Malt (500.0 SRM) Grain 1.41 %
1.10 oz Nugget [13.00 %] (60 min) Hops 37.3 IBU
2.50 oz Williamette [5.50 %] (30 min) Hops 27.6 IBU
2.50 oz Williamette [5.50 %] (0 min) Hops -
1.50 oz Chocolate, unsweetened baking nibs (Boil 1Misc
2.00 oz Kona Coffee (Secondary 1.0 weeks) Misc
2.00 oz Sumatran Coffee (Boil 10.0 min) Misc
2.50 oz Chocolate, Dark Baker's (Boil 10.0 min) Misc
1 Pkgs American Ale (Wyeast Labs #1056) Yeast-Ale
Mash Schedule: Single Infusion, Full Body
Total Grain Weight: 17.68 lb
----------------------------
Single Infusion, Full Body
Step Time Name Description Step Temp
60 min Mash In Add 22.10 qt of water at 170.5 F 158.0 F
10 min Mash Out Add 8.84 qt of water at 196.6 F 168.0 F
Cali-Belgique
BeerSmith Recipe Printout – www.beersmith.com Recipe: Stone Cali-Belique IPA Brewer: Tom Hayes Asst Brewer: Style: American IPA TYPE: All Grain Taste: (35.0)
Ingredients: ———— Amount Item Type % or IBU 13 lbs Pale Malt (2 Row) US (2.0 SRM) Grain 92.86 % 1 lbs Caramel/Crystal Malt – 20L (20.0 SRM) Grain 7.14 % 0.64 oz Pearle [8.00 %] (90 min) Hops 16.3 IBU 0.43 oz Magnum [14.00 %] (90 min) Hops 19.1 IBU 1.00 oz Centennial [10.00 %] (Dry Hop 3 days) Hops – 0.50 oz Chinook [13.00 %] (Dry Hop 3 days) Hops – 2.00 oz Centennial [10.00 %] (15 min) Hops 29.5 IBU 1.00 items Whirlfloc Tablet (Boil 15.0 min) Misc 1 Pkgs Belgian Golden Ale (White Labs #WLP570) Yeast-Ale
Mash Schedule: Single Infusion, Full Body, Batch Sparge Total Grain Weight: 14.00 lb —————————- Single Infusion, Full Body, Batch Sparge Step Time Name Description Step Temp 60 min Mash In Add 17.50 qt of water at 162.5 F 151.0 F
In 2017 I purchased a Grainfather in an effort to move beyond the earlier approaches I’ve used to brewing, i.e. the orange, 10-gallon Rubbermaid cooler (mash tun) with the copper manifold, spigot, etc.
While that mash tun works, and I appreciated the brews that I made on it, it really only worked for single infusion mashes, or mashes that included one or more decoction steps.
So, in late-2016, early-2017 I started looking for a system that I could direct fire (or heat). I also wanted a system that would re-circulate when mashing. Obviously, I also wanted something that could be temperature controlled, preferably by electronic (and remote) means.
At the time, I recall narrowing my options down to either the Grainfather or the Braumeister. Alternatives were expensive: for instance, a three-tiered brew systems. I felt intuitively that my wife would murder me if I spent that much on one system. Some of the options that are available today were not available when I was looking in 2016/2017.
Features
I’m not going to go into all-encompassing detail on features. There are plenty of youtube videos, as well as the Grainfather company site, to which to refer for specifics. What I’ll discuss is what I have found to be most enjoyable/useful about the system.
Recirculation
Yes, I know that recirculating infusion mash systems (rims) aren’t new, but they are to me. The system has a magnetic drive pump (6 watt, 1800 RPM). It isn’t the strongest pump in the world, but it’s better than dealing with gravity, tubing, and 212 degree wort.
Pump filter
There’s a filter in-between the interior of the Grainfather and the pump. This vastly improves the your chances for not getting a stuck sparge, as when your grain bed is sitting on your slitted manifold.
However, the filter sticks out into the Grainfather like a wart off someone’s chin, and at least one time I’ve hit it with my mash paddle where it had the effect of a straight razor on said wart. When the filter comes off the pump, you’re screwed: unless you want to stick your arm down inside boiling wort.
I purchased a hop spider, which greatly reduced the likelihood of a stuck sparge. The pump filter has large enough holes that the detritus of pellet hops slips through.
Grainfather connect
Grainfather connect allows for a bluetooth connection from your phone to the controller, so you can control all aspects of the mash timing, from your phone.
Often times I don’t have the full amount of time required to have a brew session. Grainfather connect allows me to sit with my family and still monitor a step mash, for instance.
There’s a Grainfather brewing app that allows you to put in your recipes and execute them from your phone, but the app is buggy and you’re better off setting everything up through their website and then running it from your phone.
You can also program the unit to pre-heat in advance (assuming you have the water in it and ready to go), and pre-set mash steps.
Grain basket
The design of the Grainfather in this regard is very good. When you’ve finished mashing, you simply lift the grain basket out and let the lauter begin. The “feet” on the grain basket rest on the interior brackets. You can extend the grain basket to 19.8 pounds. Extending is something I should have done during my most recent brew (to be discussed later). The limit is on mashing in the grainfather (hint: 21 pounds of grain doesn’t work very well).
Counterflow wort chiller
The wort chiller is great. As I’ve posted before, I’ve got the Blichmann Therminator which is a fantastic plate chiller. While the Therminator works better, in my opinion, than the counterflow chiller, you can connect the Grainfather counterflow chiller to the pump, which makes the difference. I’ve also connected my Blichmann Thrumometer to the brew-line-out of the Grainfather chiller, which allows for inline temperature measurements,. The Grainfather chiller works extremely well with only a slight influx of cold water. I empty the hot-line from the chiller into my washing machine so all excess water serves two purposes.
Quirks
There are some clunky aspects of the Grainfather (besides those I mention above):
If you want to perform a decoction mash while using the Grainfather, you virtually cannot use the top mesh screen. Absent the top mesh screen, you risk grain spilling into the main tank, which you’ll use later for boiling.
The top recirculation arm is very tight against the glass lid. Should you need to remove the lid, you’ll need to take the recirculation arm off to take off the lid. This ensures that hot wort will run down the side of the unit, onto the pump housing, and the floor). The unit can also be touchy in terms of scorching on the bottom.
If you fail to remove scorch marks from the bottom of the Grainfather, you’ll have some problems. The scorching will build and trigger an emergency shutoff of the Grainfather as the heating element is on the bottom. Also on the bottom is the reset button. To reset the unit, you’ll have to lift it up. That’s a problem if the unit is filled with a mash or wort. This also goes for any additions you make which could scorch (extract, honey, etc.)
Final Thoughts
Despite my pickiness about a few things with the Grainfather, it’s a positive development in my brewing experience. That I can use one piece of equipment to both mash and boil is great in itself.
The bluetooth remote control, the ease of step mashing, the pump controlled re-circulation and wort chilling, and the ease by which you can move wort into the fermenter makes the brew day nearly effortless–at least in comparison with the old Rubbermaid mash tun, and 8-gallon brew pot.
Cleaning the unit is fairly easy as well. The insulating jacket pulls off, the Grainfather connect unit disconnects, and the recirculation features of the pump can be used to clean the unit and the wort chiller.
Right now, for instance, to clean off some scorching from last night’s brew session, I’ve got the Grainfather set to 140 degrees and some PBW mixed into two gallons of water. I can control the temperature of the water via my phone and can later re-circulate the clean water through the unit and the wort chiller while sitting on my couch.